New (7/2/2019) Sound Mixer
5/28/2026
We have replaced the Mackie 24 channel analog mixing console with a Mackie DL32S, which is a digital mixer. A digital mixer can have several preset “Shows” for quick set up. Using the old analog mixer, adjustments made during one service can affect the next service unless the operator has a detailed record of previous settings, and carefully returns all controls to those settings. With a digital mixer, we can have a standard starting place for each type of service. Snapshots of adjustments (improvements?) to the standard setup can also be saved and recalled.
This digital mixer has no physical control interface. It is a box with inputs and outputs. It is controlled from another device, typically a computer, tablet or a phone, which connects to the mixer using Wi-Fi or Ethernet. We primarily use a 17” Samsung View2 tablet to control the mixer. The mixer can be operated simultaneously by up to 20 WiFi connected devices. This provides the capability for musicians on stage to adjust their own monitor mix to suit their preference, without the primary sound operator having to make subjective adjustments (“my vocal up just a hair in the floor monitor”) from the console. These remote devices can be set up to access only the one monitor mix, not the overall sound.
It is also possible for the primary sound operator to control the sound from the floor or wander around and make real-time adjustments as needed based on what it sounds like in the audience.
Control is distributed across several pages instead of all controls being simultaneously available on a physical board. Phantom power can be applied only to specific channels (the old board had one switch for all channels). The operator will have to know what page to use to make the required changes. This takes some getting used to.
Here is a procedure/training document for the system.
Here is the new physical layout:
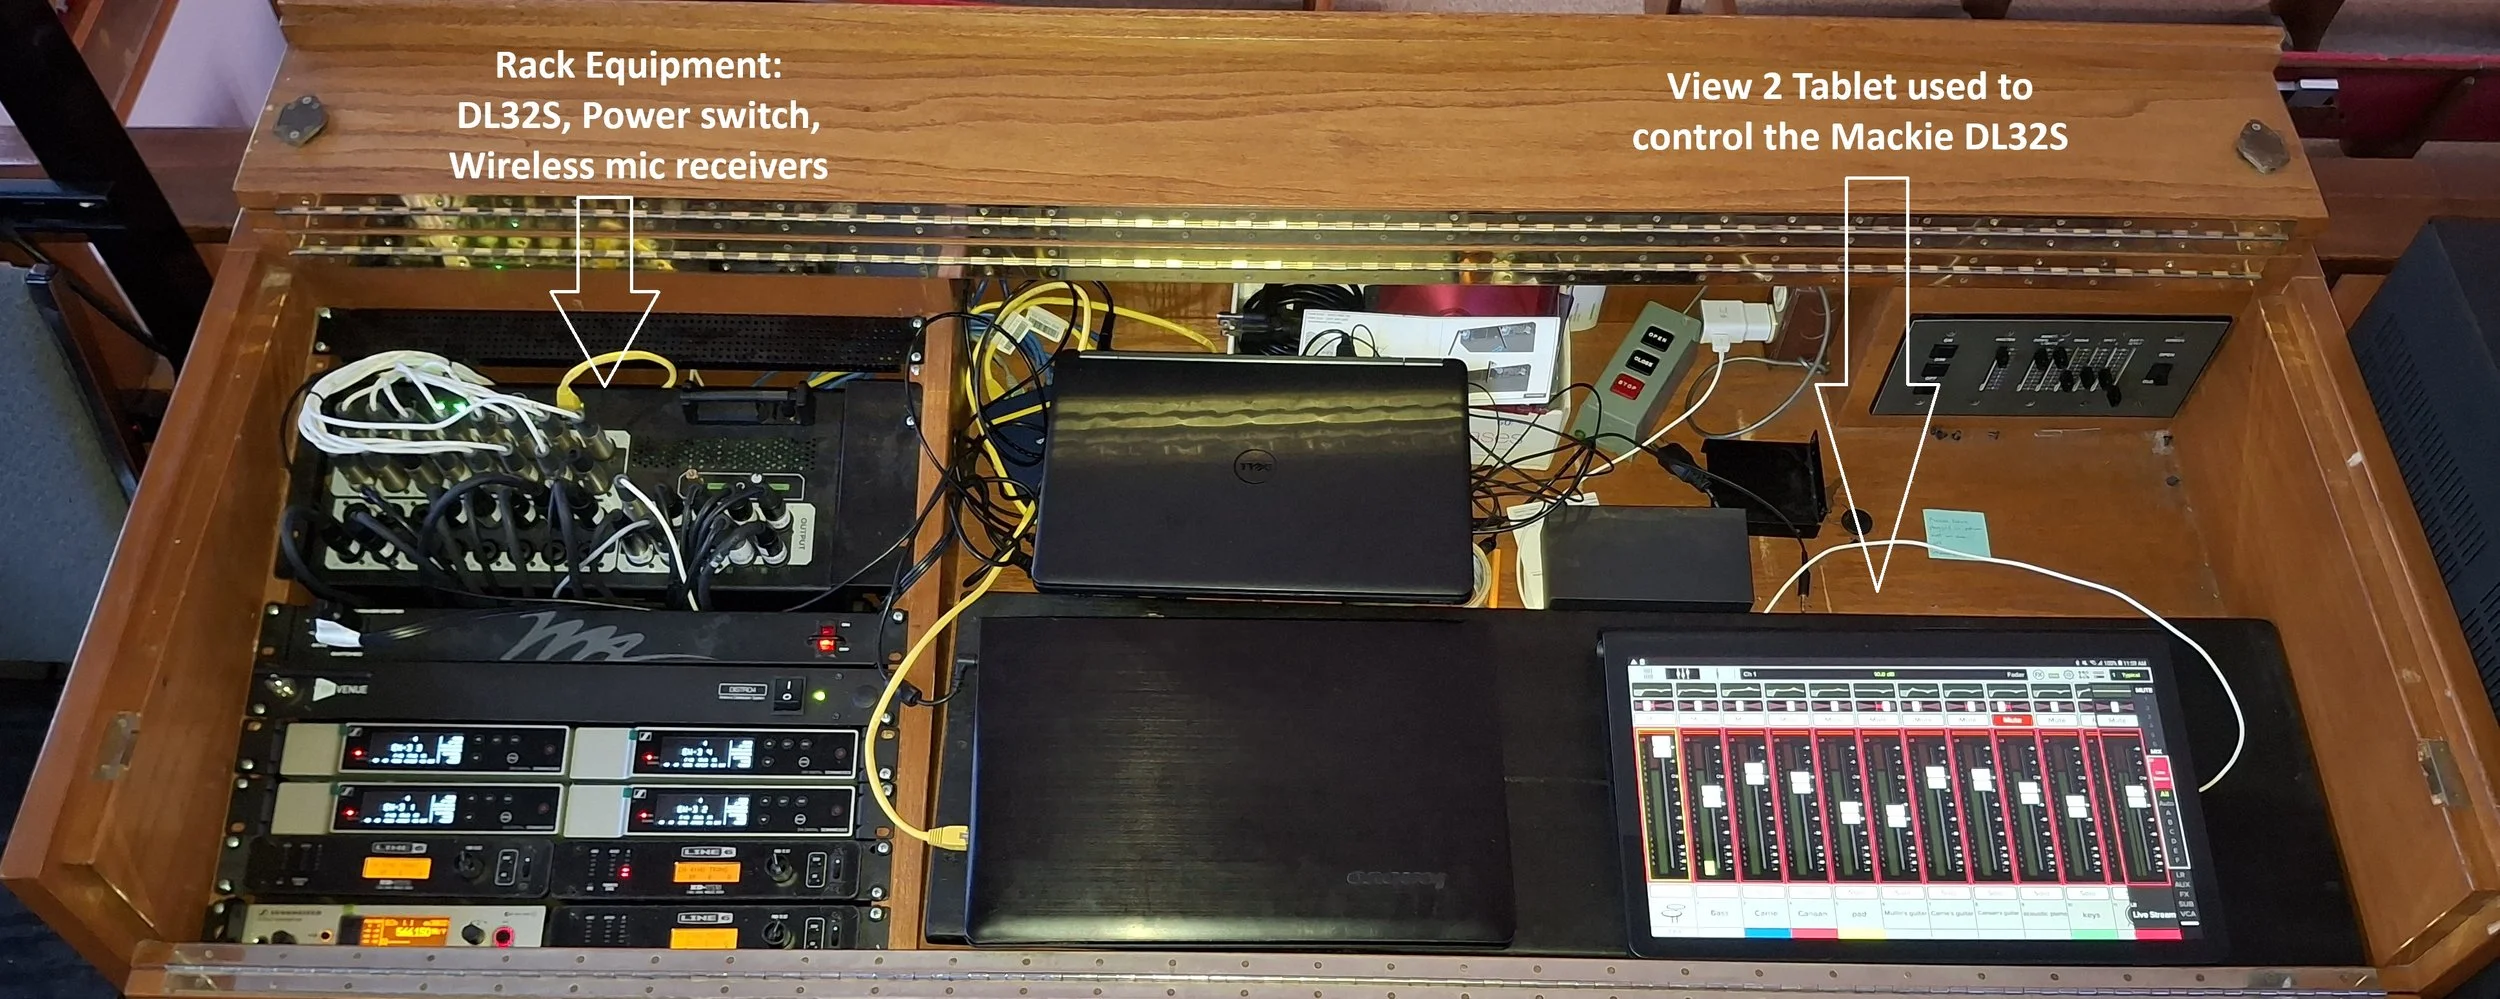
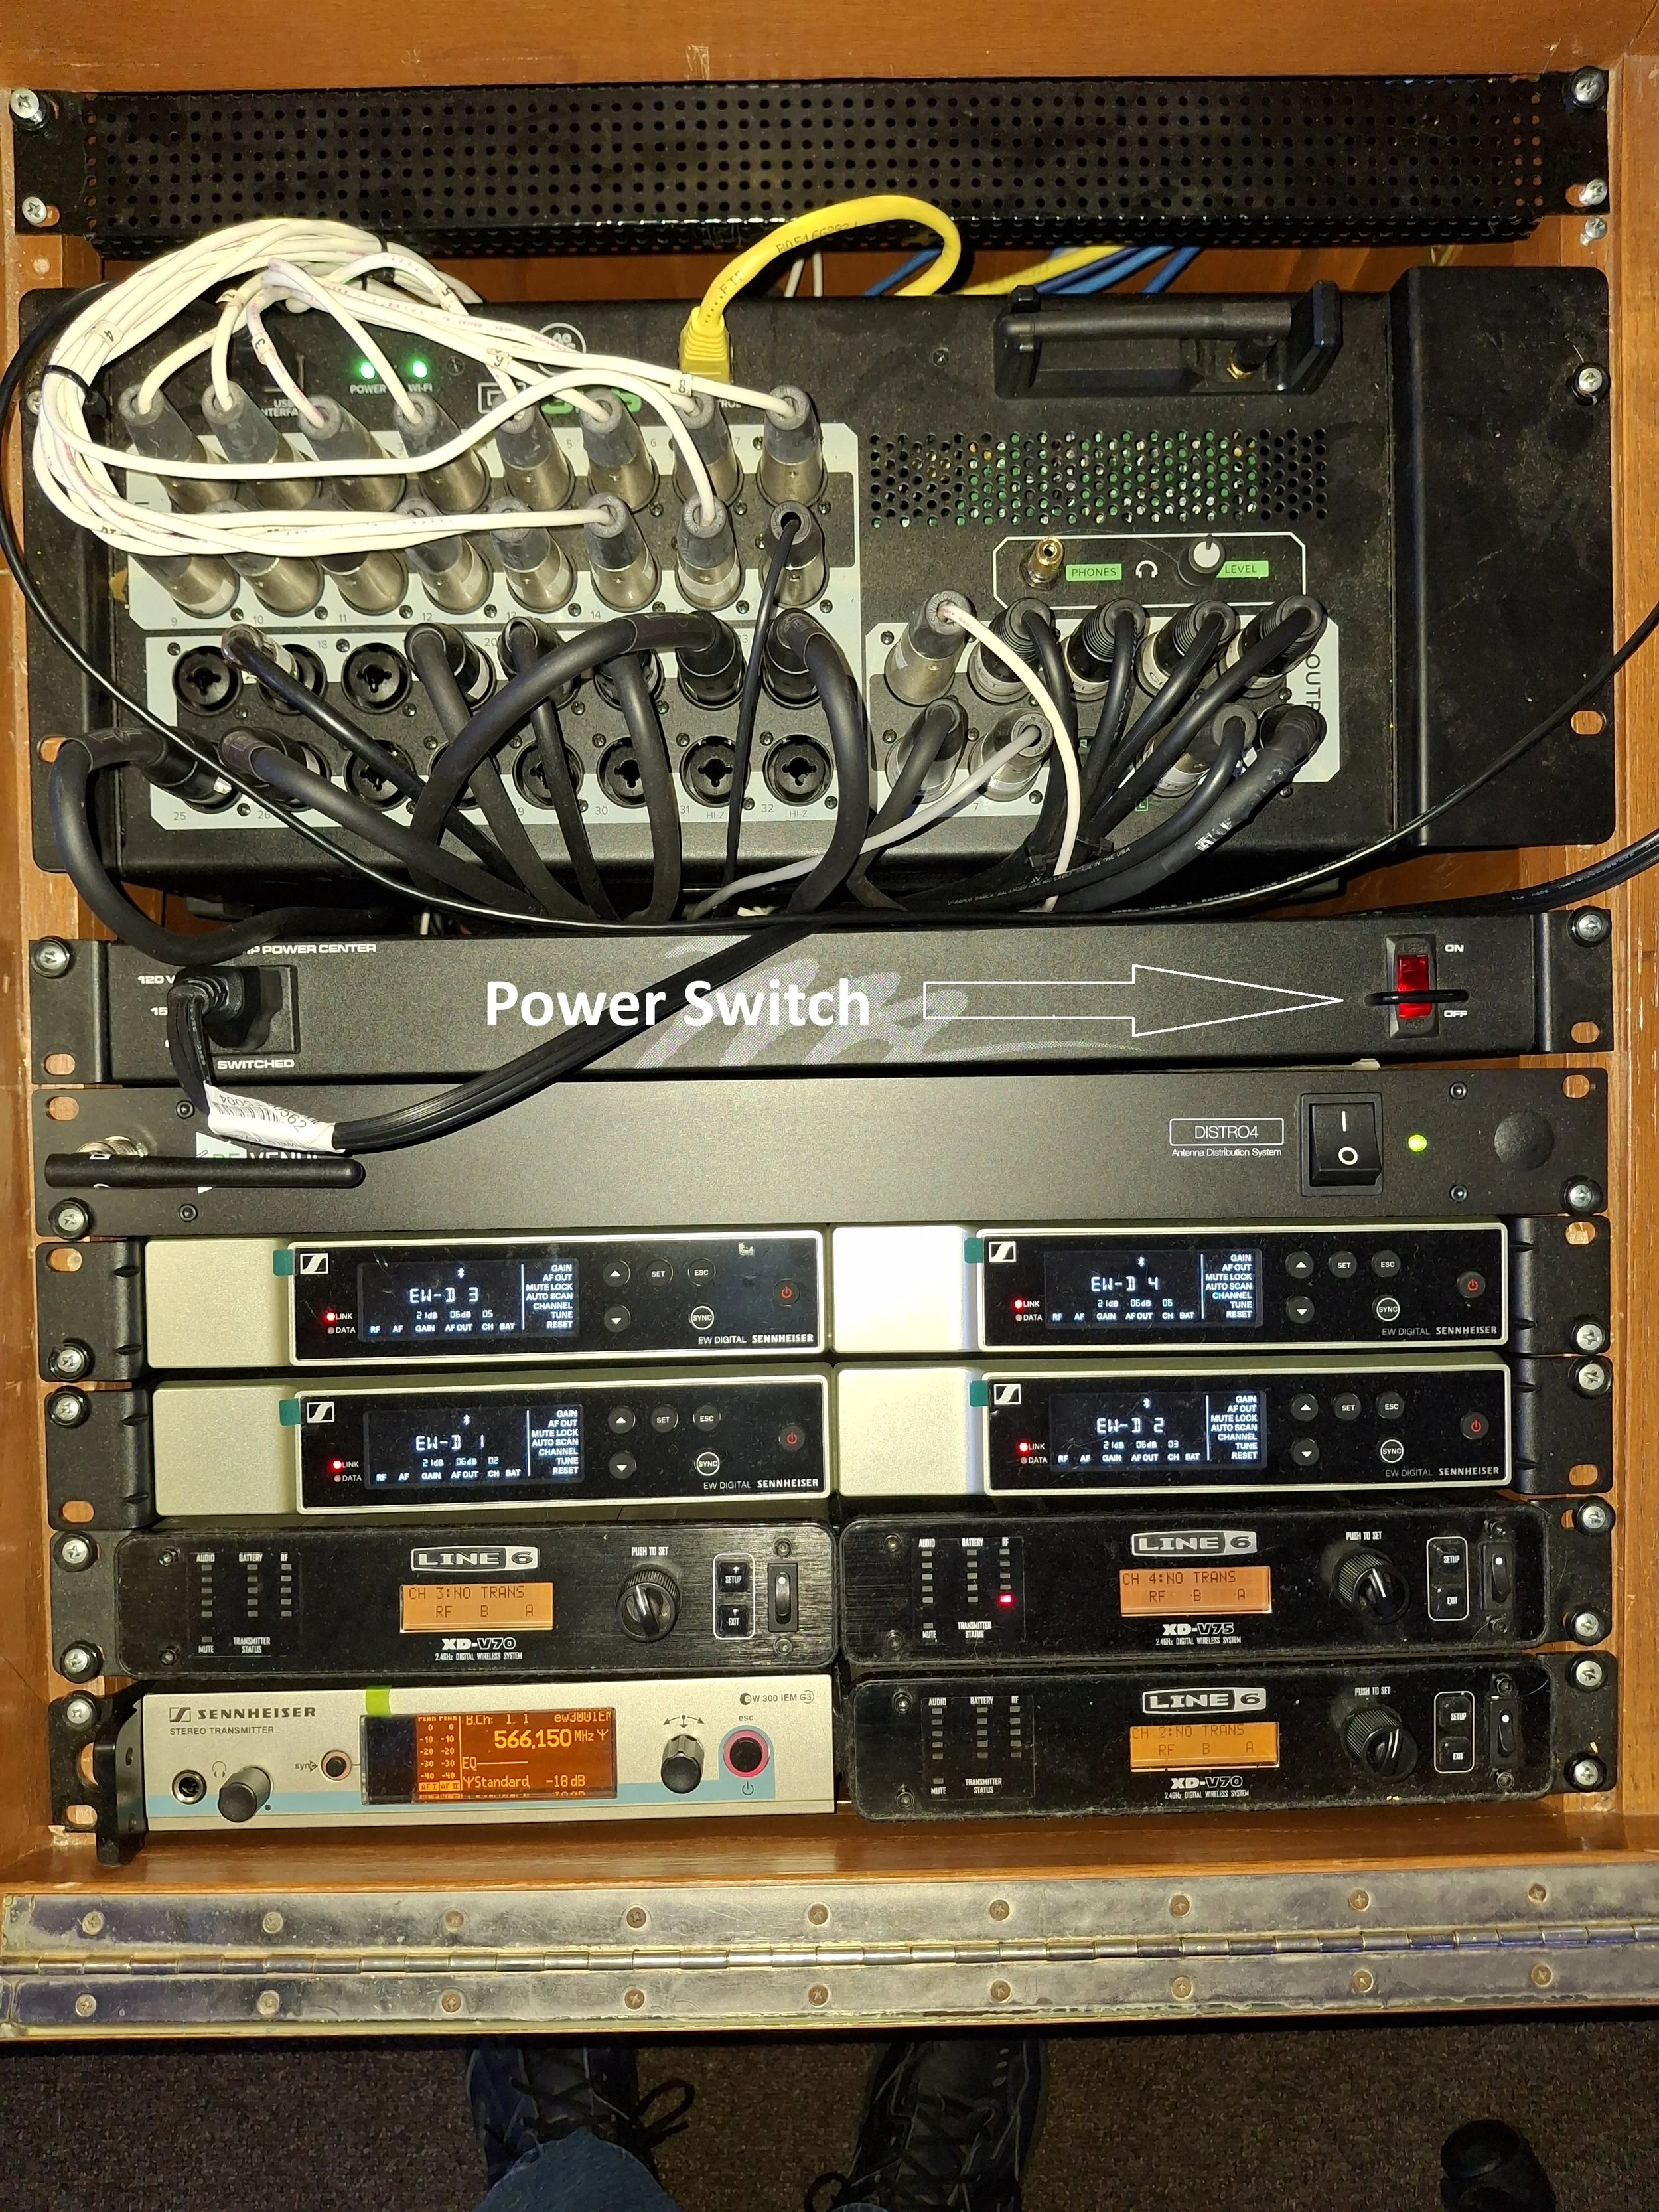
To start up the sound system, turn on the main power switch on the rack. This turns on power to the rack, including the DL32S and the wireless receivers. Leave all the individual power switches on. All devices can then be controlled from the one power switch.
The DL32S should have one solid green light, and one flashing green light. The flashing green light shows that the unit is not yet connected to the control device. To control it, turn on the tablet:
· Hold down the upper right button for about 5 seconds and allow it to start up
· Swipe across the screen to enter the password
· Tap SHIFT twice to get caps lock
· Enter the password
The home page should display:

We are now using the UBCAV Network to control the DL32S via the large tablet. Verify that the tablet is connected to the UBCAV Network. If the WiFi is properly connected, tap the Master Fader icon on the bottom of the Home page.
Master Fader should start up and display a set of faders. It is not yet connected to the Mackie.
To connect to the Mackie DL32S, select the Mixer icon in the upper right panel:

The mixers available to be controlled (only one in our case) are displayed:

Tap the mixer icon, and the mixer is connected.
Usually, there will be a pop-up asking if you want to synchronize the tablet with the DL32S. Select the mixer (DL32S):

The tablet is now connected to and displaying the state of the mixer. The two green lights on the mixer should be solid green. The WiFi symbol over the Mixer icon should also be solid green (if it is alternating green/yellow, the tablet will not be able to control the mixer – call for assistance). Now, you need to set the mixer to a baseline show, by tapping on the SHOWS target at the top right of the tablet page:

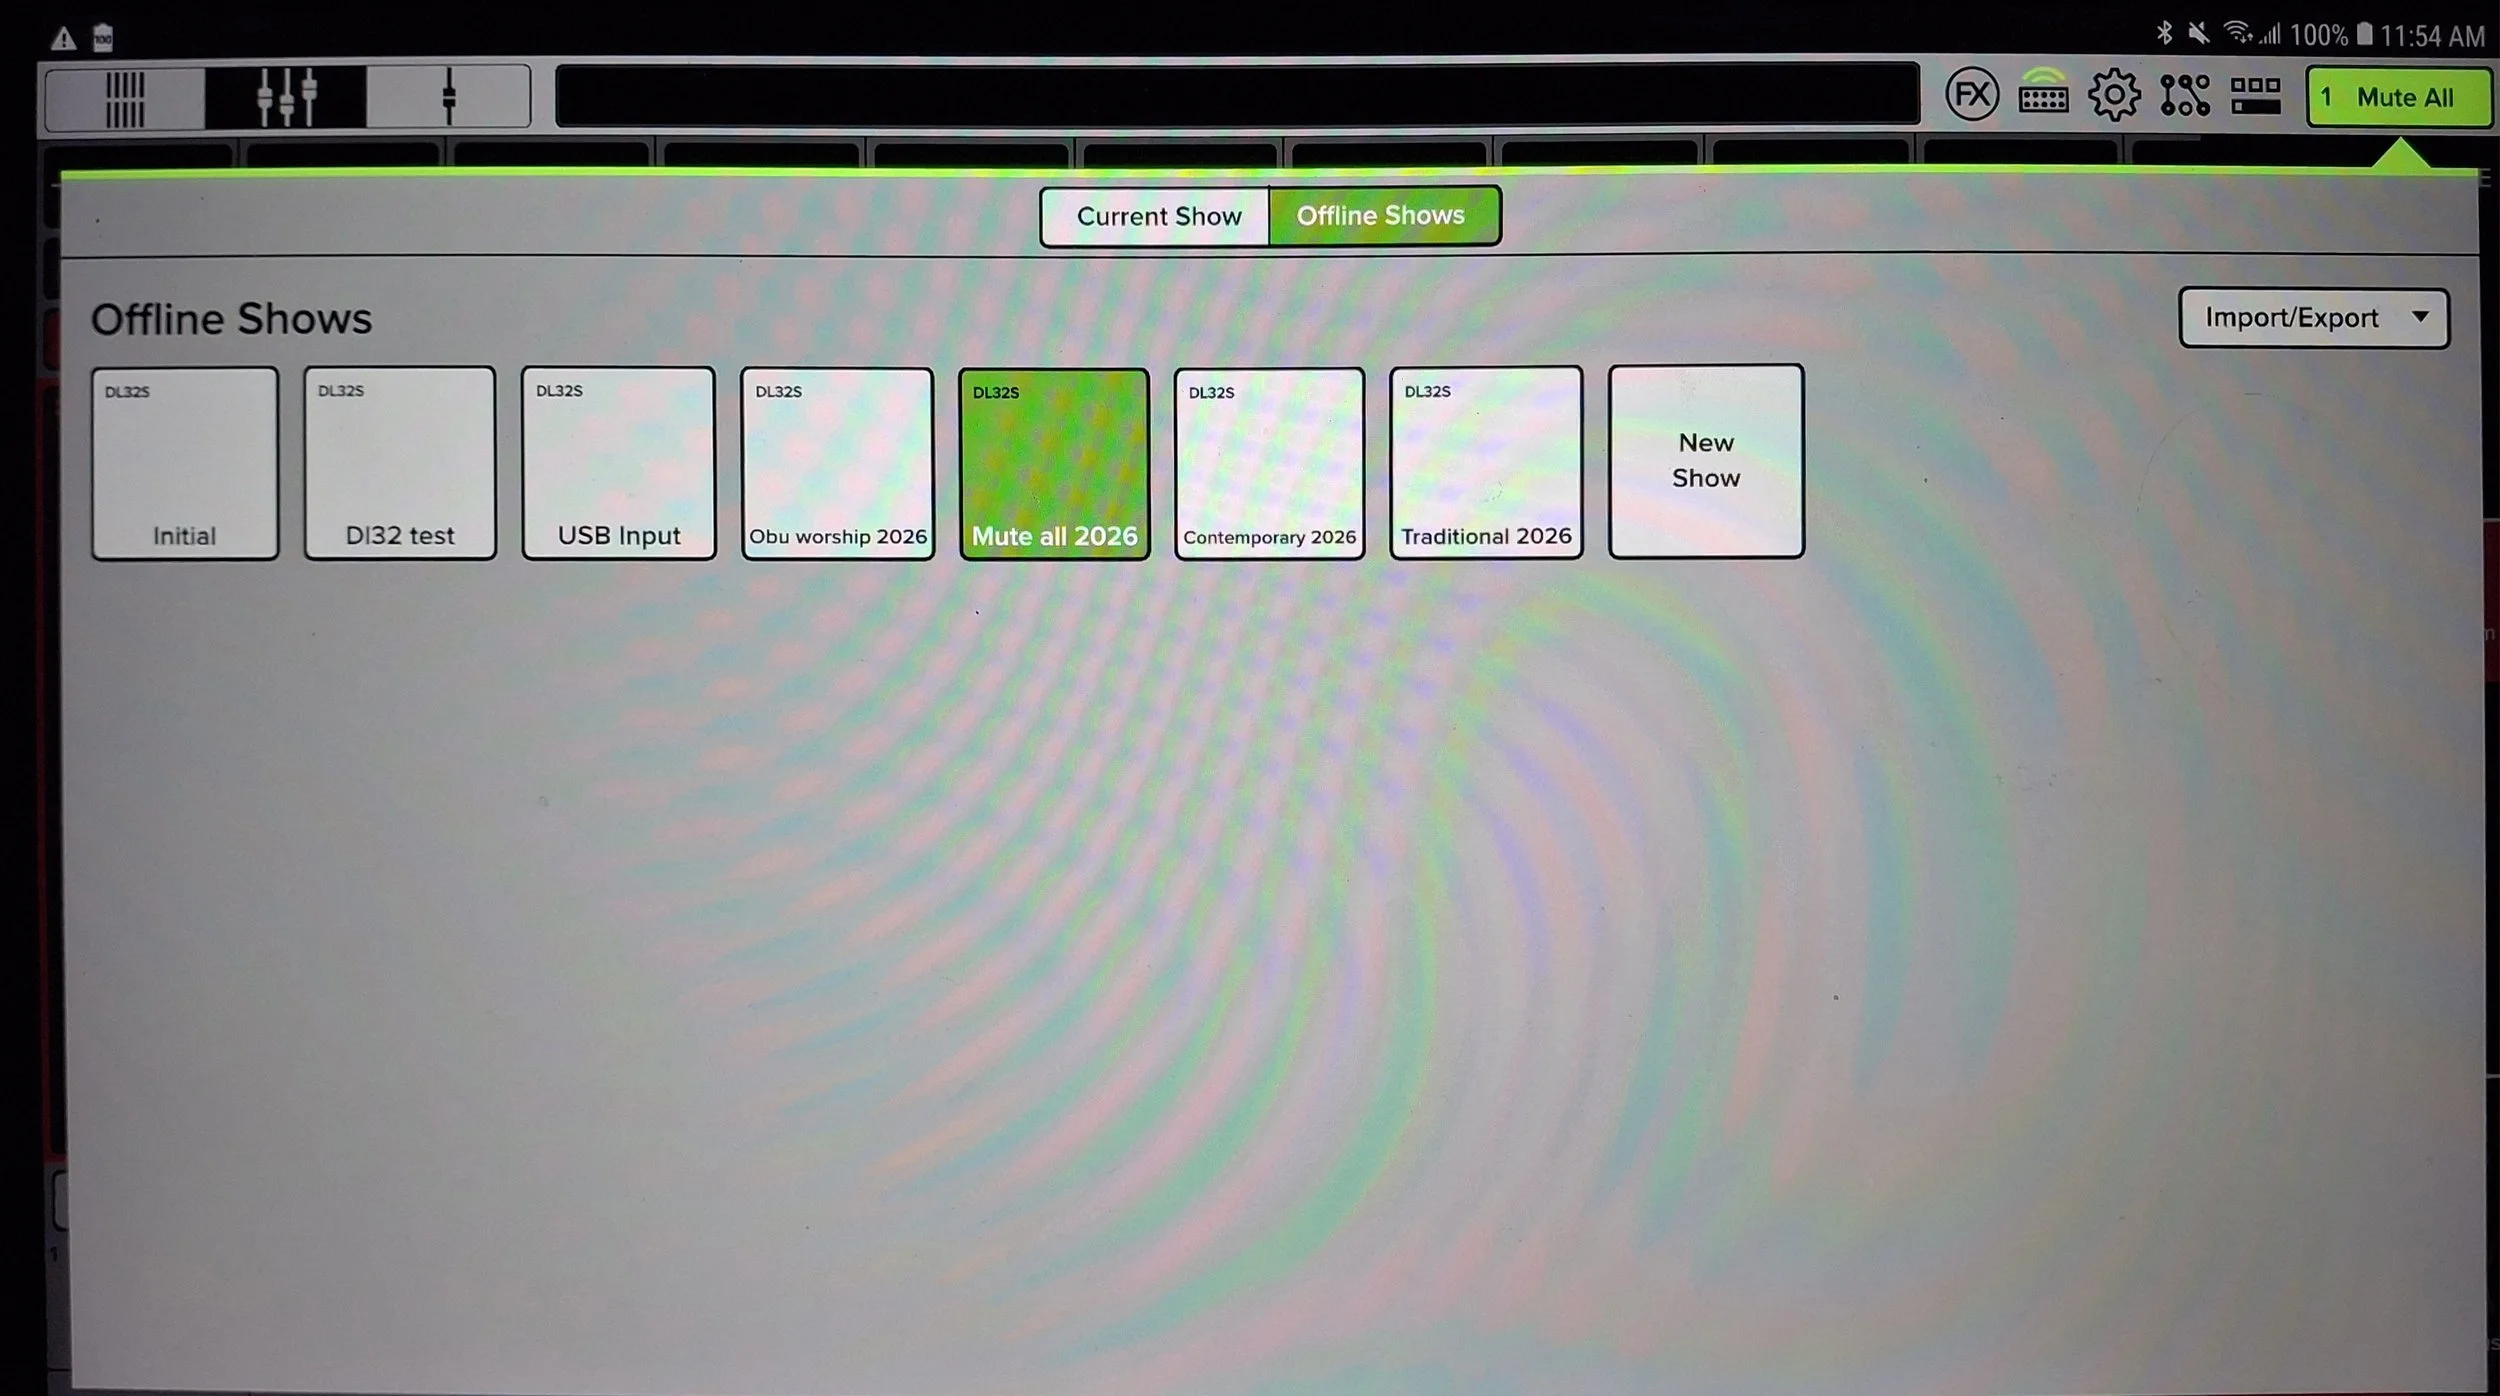
From the SHOWS page, select “Offline Shows”:

Select and load the show you wish to use. Current choices are “Traditional 2026” or “Contemporary 2026” (The 2026 designation reflects the changes made in 2026 providing a stereo mix to the live stream computer and shifting the MAIN feed to the Aux 1 page):
Once the show loads, choose the appropriate snapshot (Note – “Typical” is a good place to start, but we may add other variants as needed):
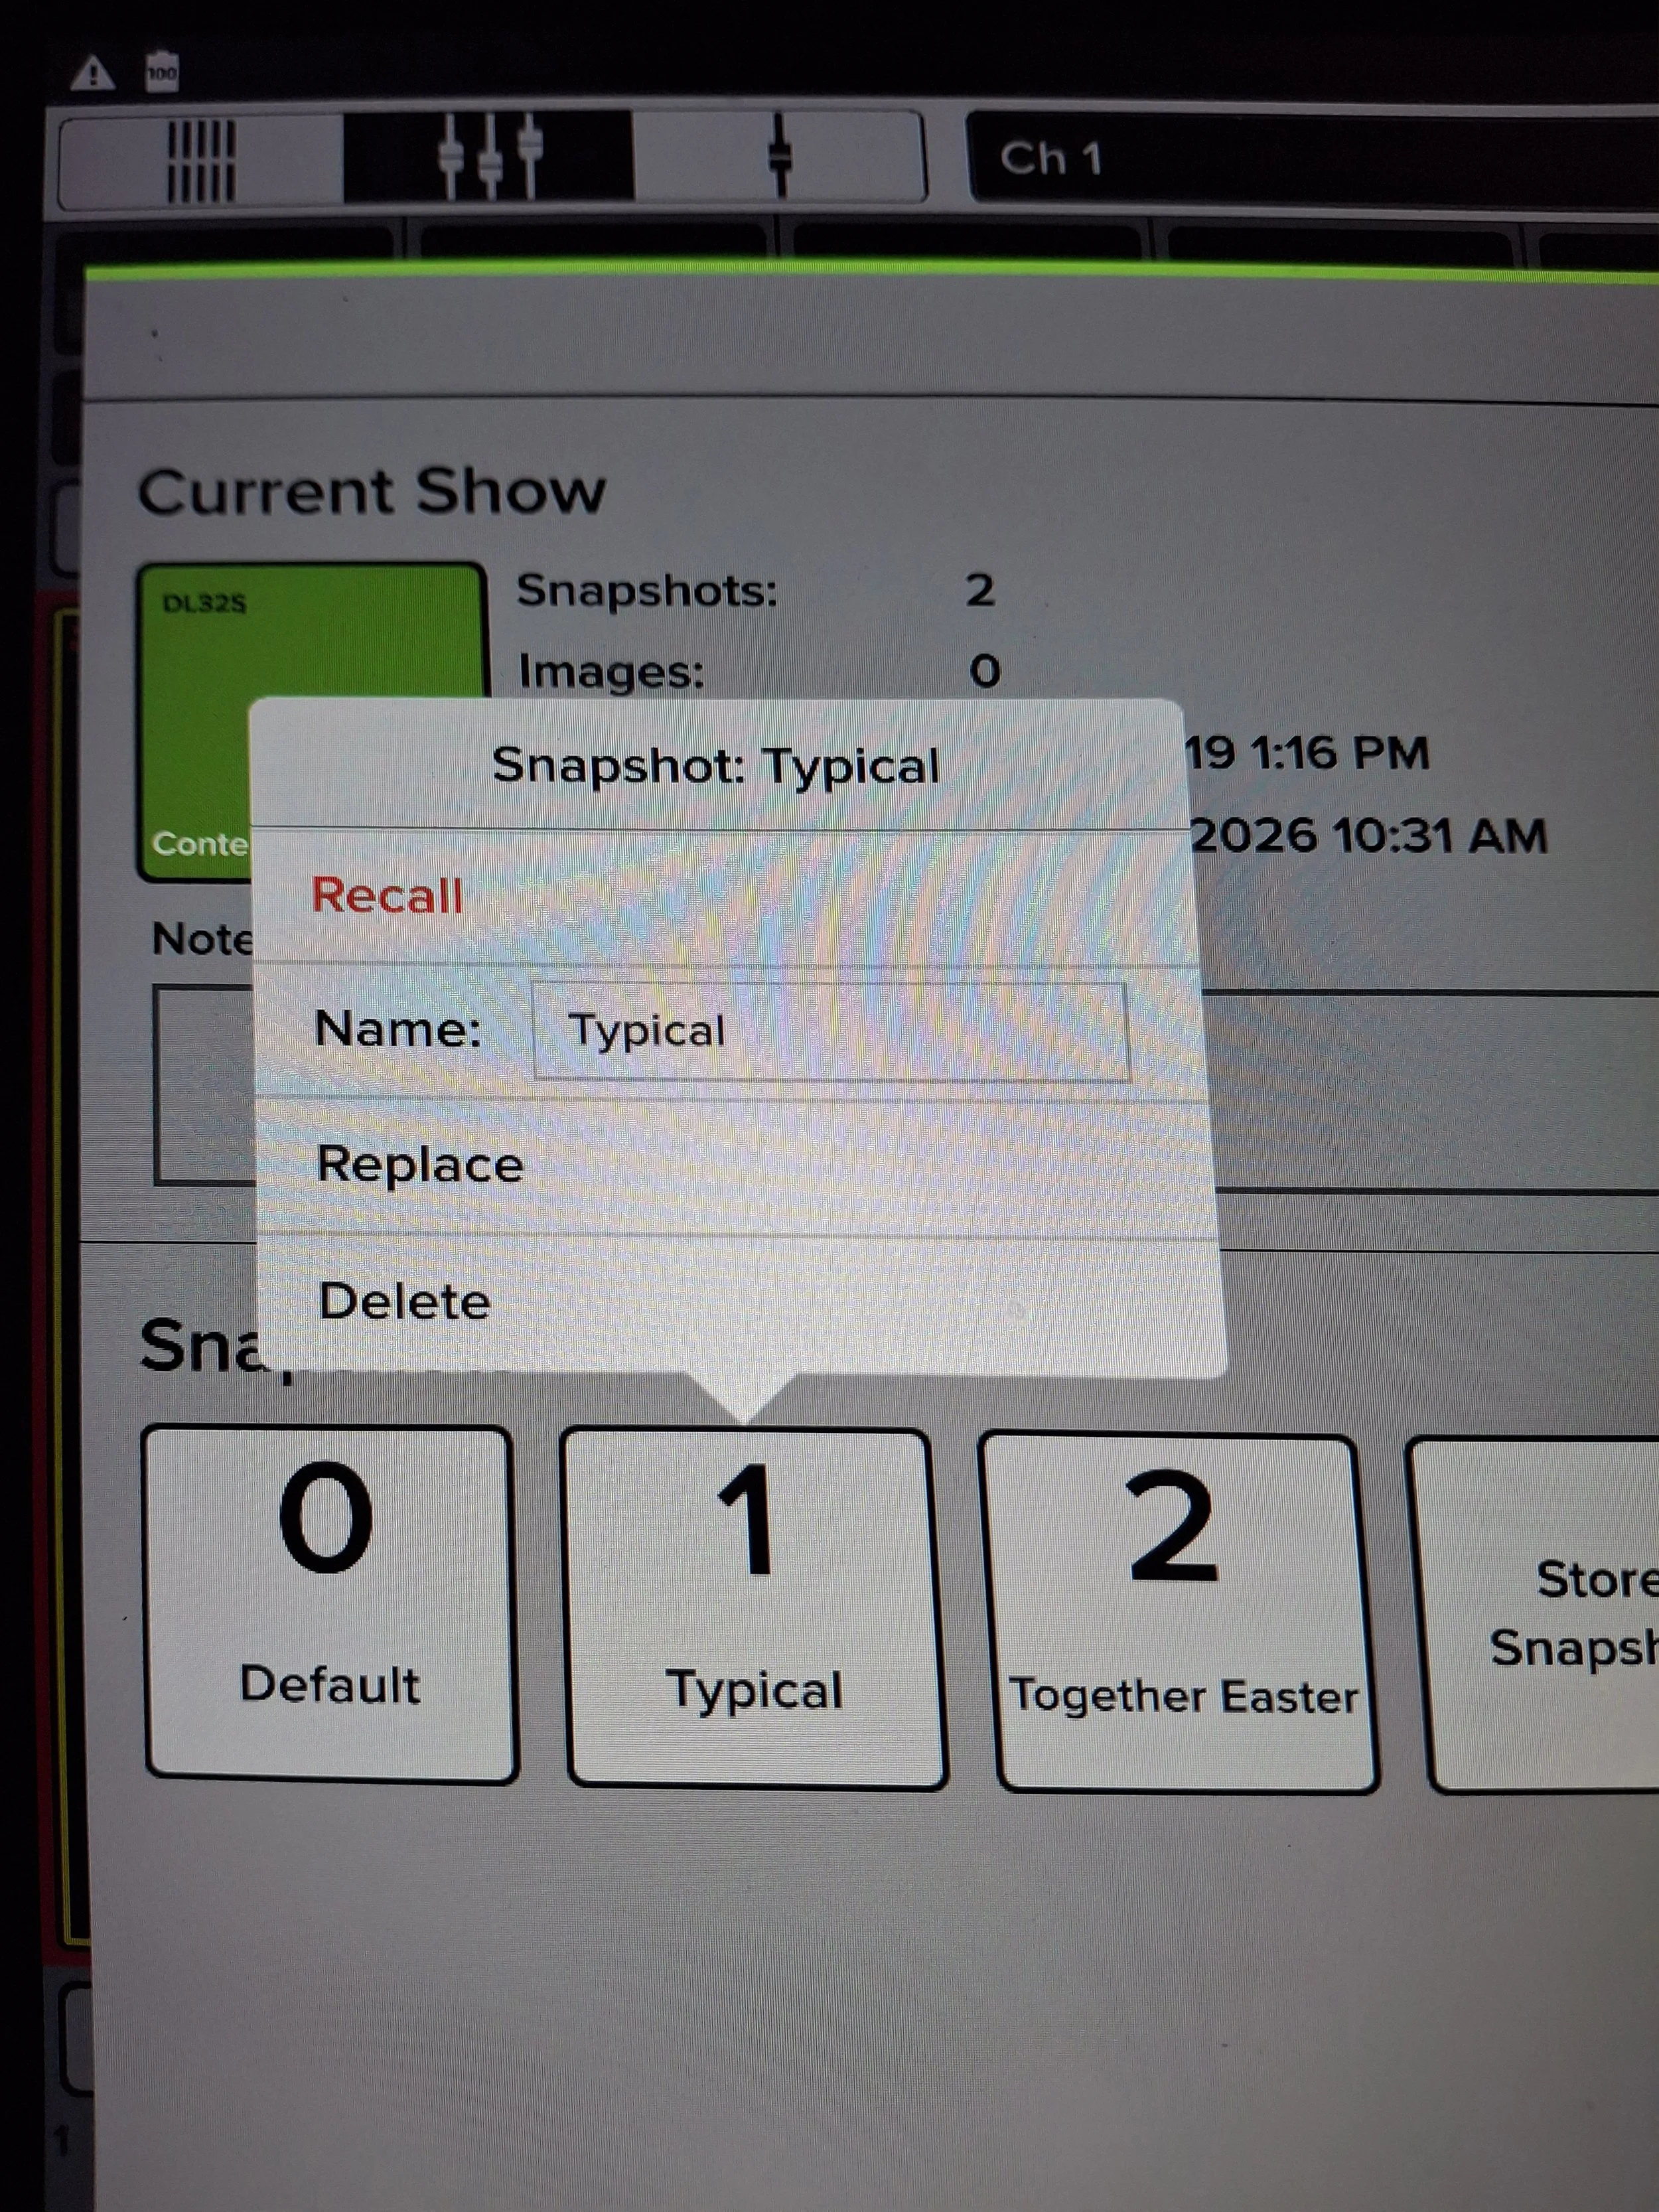
Recall the snapshot and then confirm the selection.
Now you can go to the Live Stream page, Main page and the Aux pages to unmute the appropriate outputs and inputs and get the levels set.
The Faders are displayed by tapping the FADERS icon at the top left of the page. The Live Stream, MAIN and AUX Pages are accessed by tapping on the Live Stream target on the right of the page. This will display all of the pages available to control. Tap the target for the page you want to work on. We are not concerned with VCAs or Subs at this time. Only the first seven targets on the left column are commonly used. We do occasionally make adjustments to FX1 (Reverb).
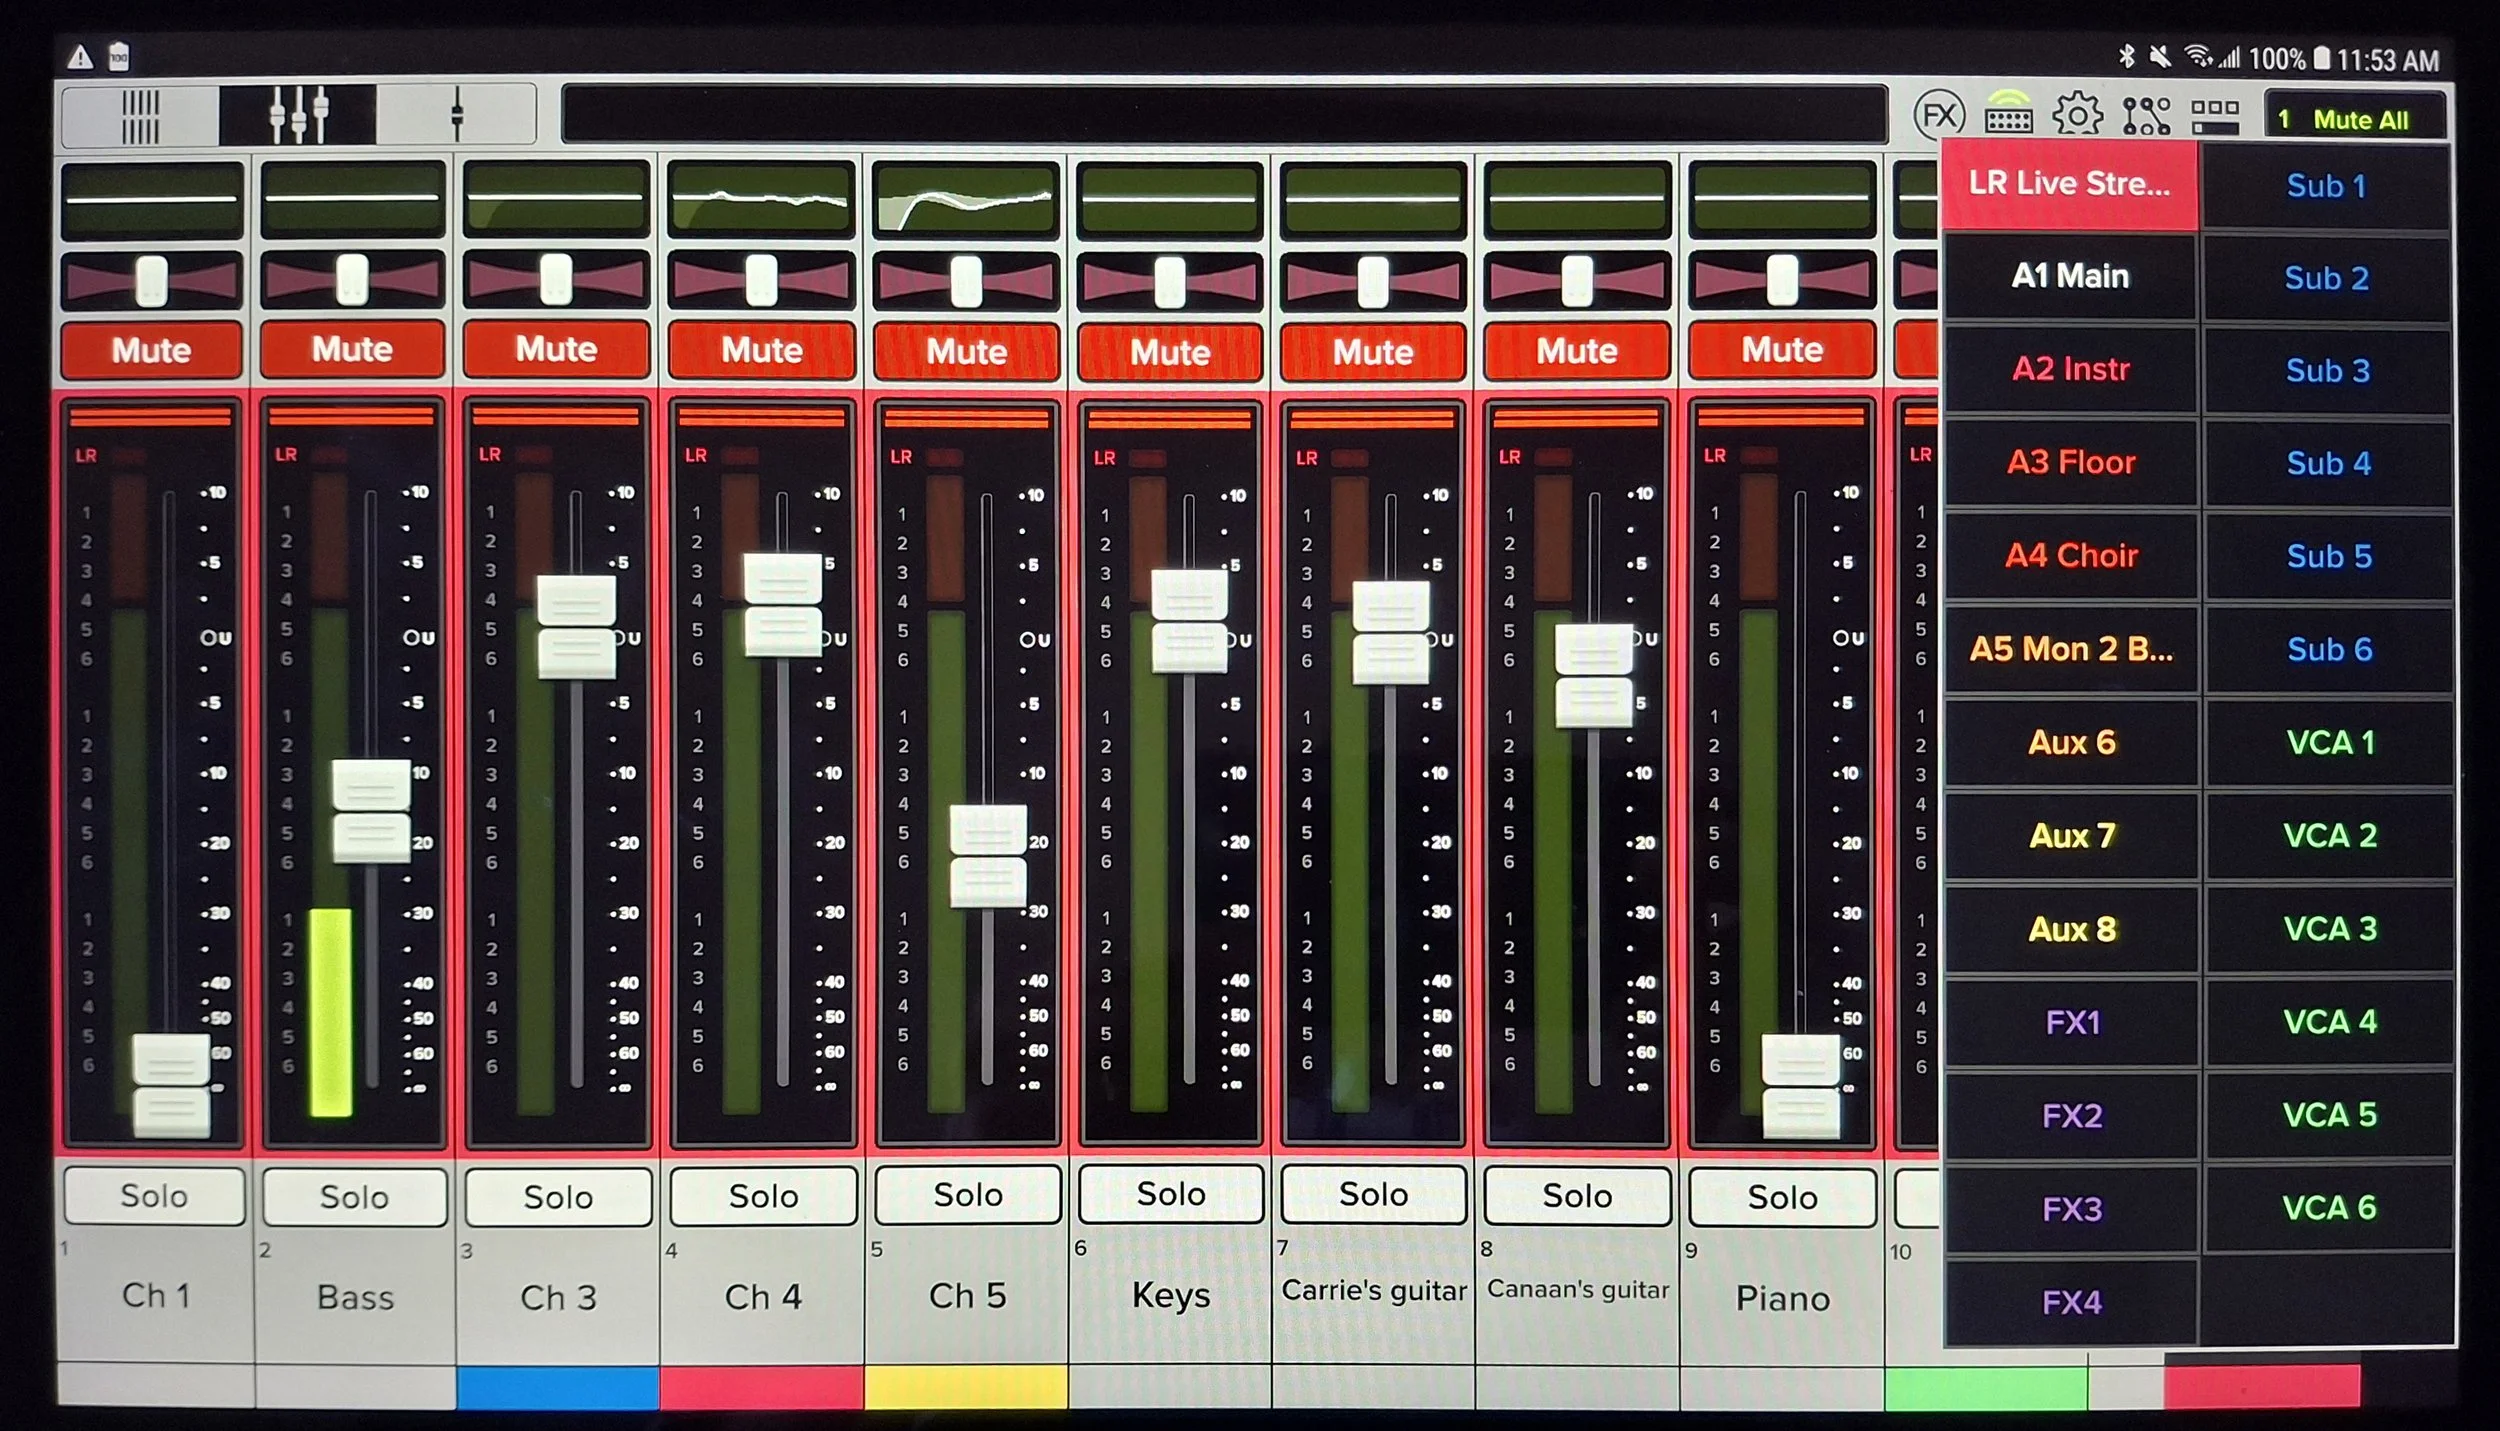
The “Live Stream” target will open a set of faders to adjust the Live Stream mix, the “Instr” target lets you adjust the Instrument mix, and so on. You will need to be familiar with these pages to be able to get around and make settings changes, particularly in a Contemporary rehearsal. Once set, most of the time you will be working with the Faders and Mutes on the MAIN page and possibly adjusting the various monitor mixes, particularly in a Contemporary rehearsal.
The Live Stream operator will make adjustments to the Live Stream mix.
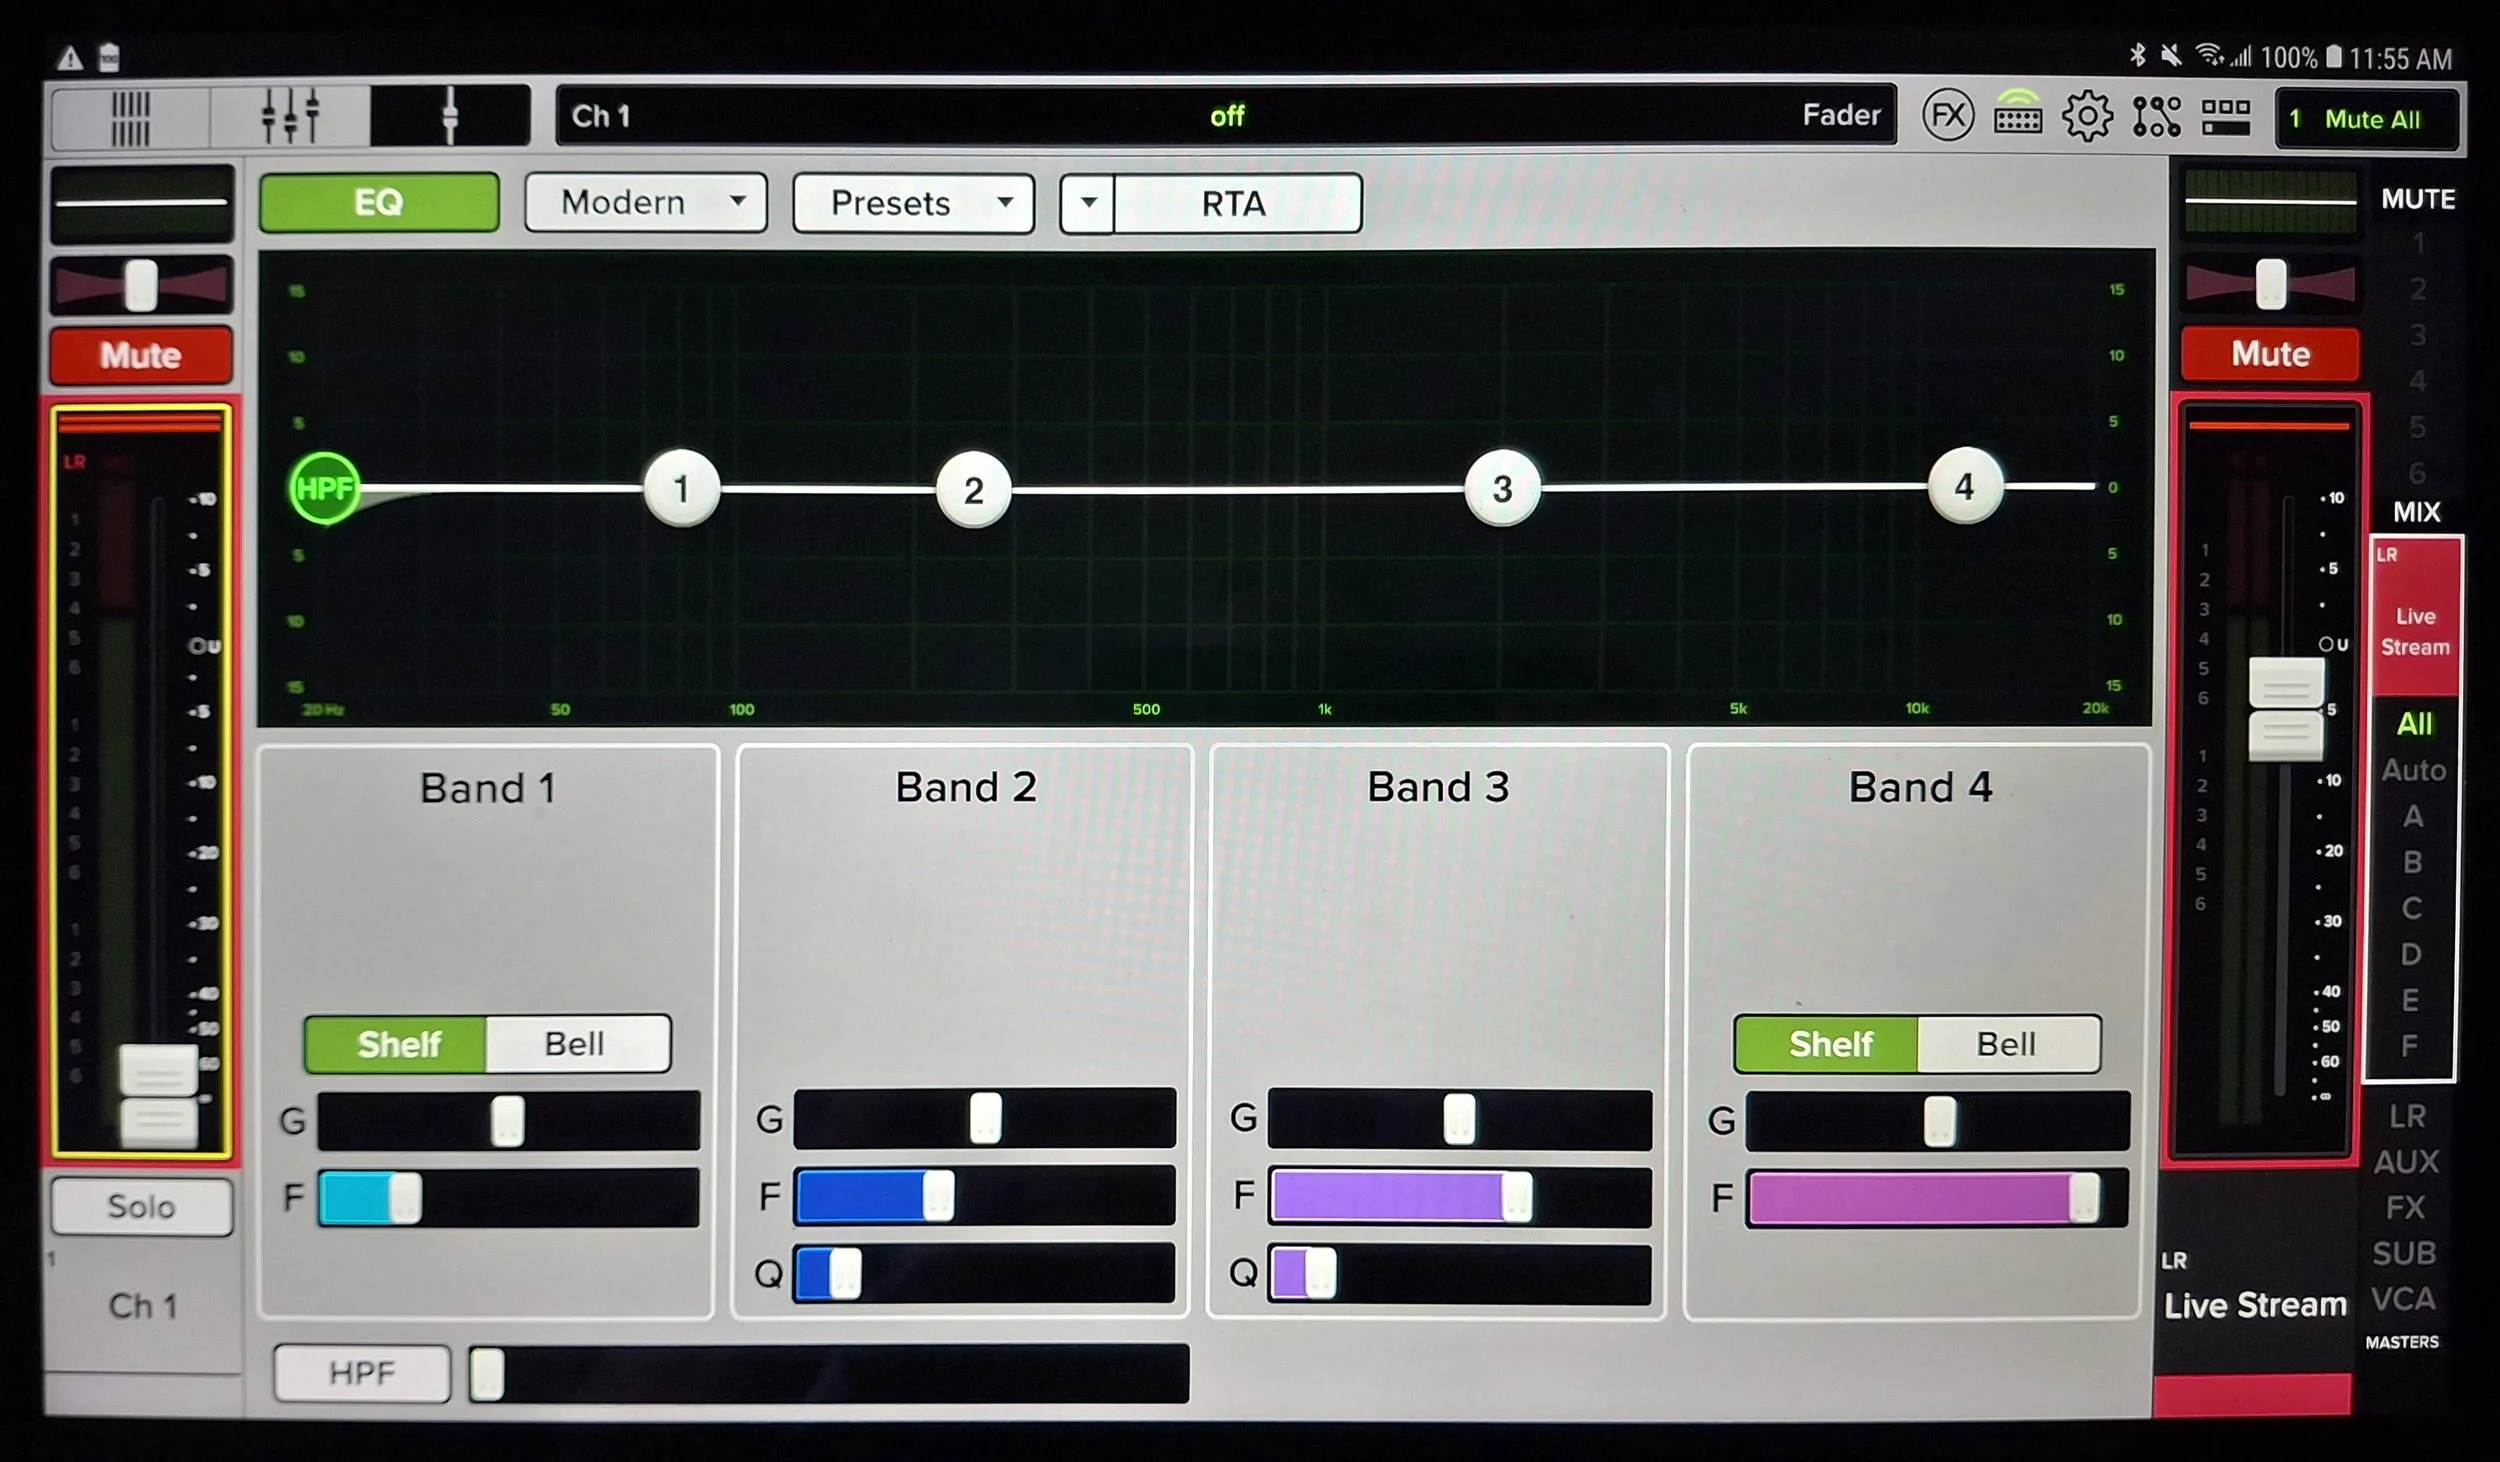
Each channel can be modified by tapping on the EQ target at the top of the channel (above the PAN control). This opens a series of three pages that can be reached by swiping up or down. These pages should be left to experienced operators, except for the case when there is clipping happening, indicated by a red light at the top of each channel display.
The first page is the EQ page. This is where you can affect the sound of the channel. In some cases, we may need to roll off the bass response to prevent feedback or prevent excessive bass coming through a microphone near the bass amp. The channel below has no EQ in use.
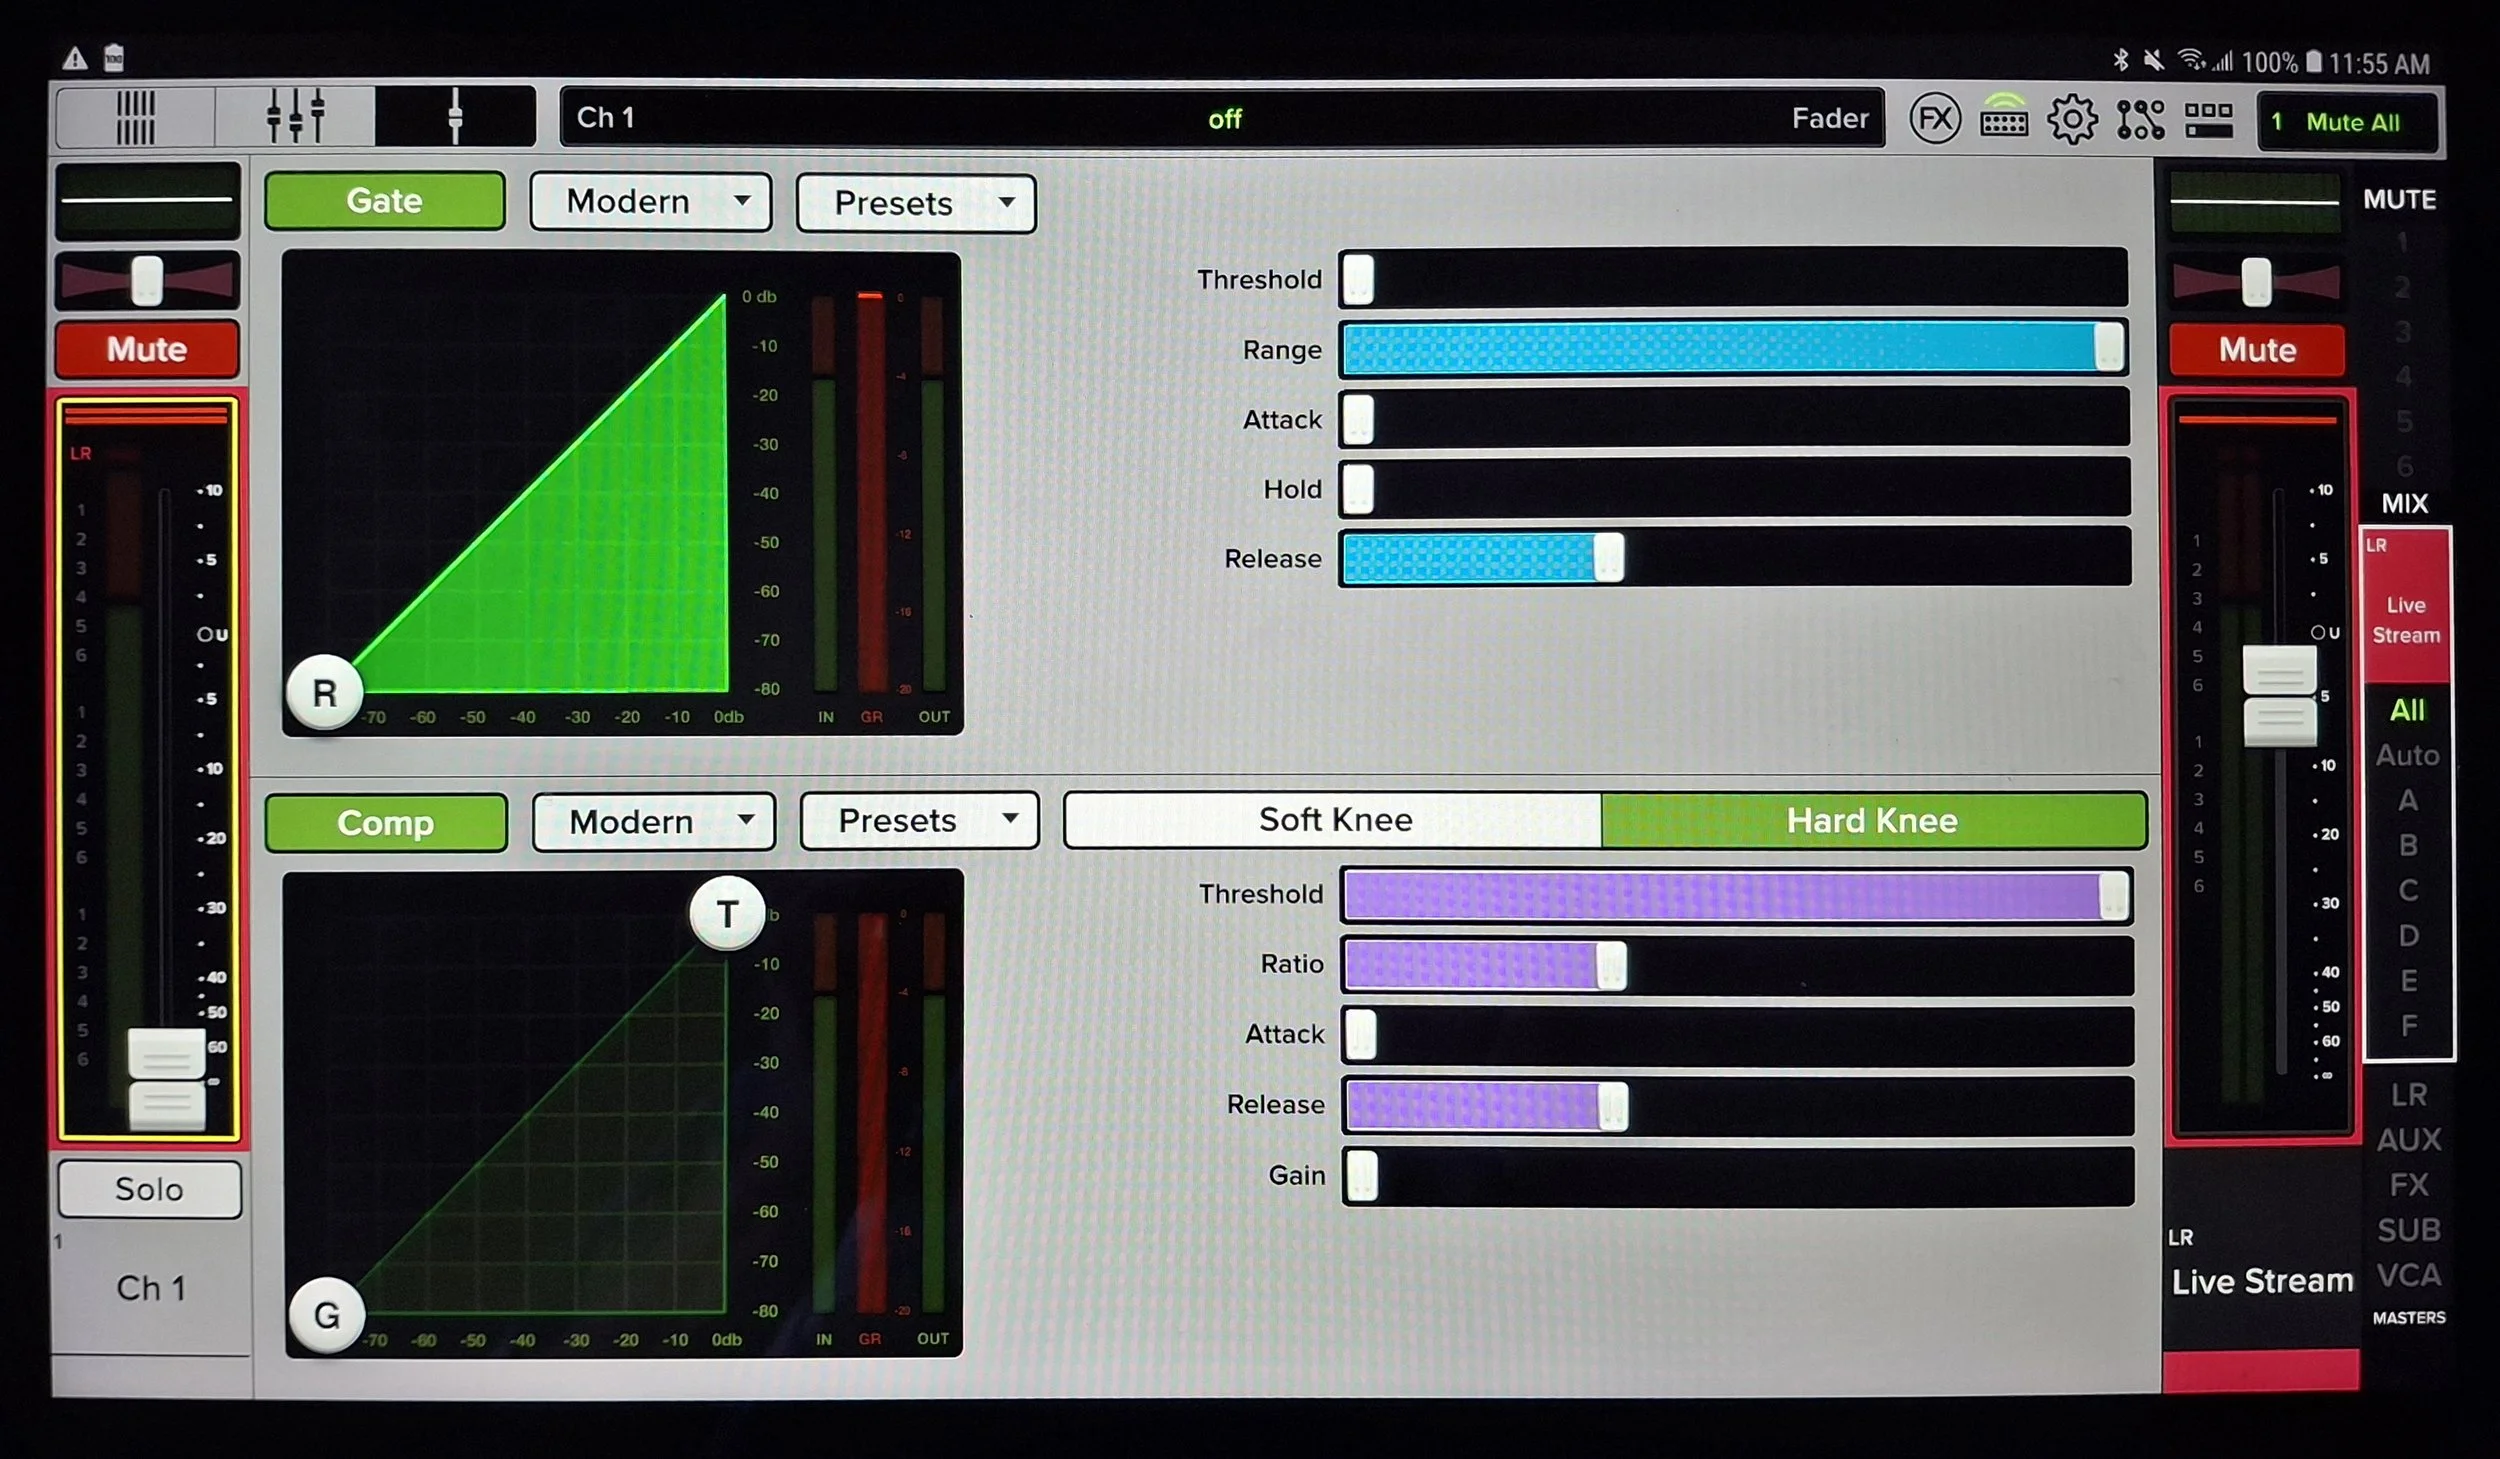
Swiping up brings us to the next page, which has a Gate and a Compressor. The Gate can be used to cut off low-level noise when the channel is quiet but turn the channel back on when the sound level is above the gate threshold. You shouldn’t play with this unless you know what you are doing.
The Compressor is used to limit loud outbursts. You can set a volume level at which the gain is decreased for louder levels. We compress the Live Stream output slightly to avoid clipping. We also compress certain microphones for the same reason.
Swiping up again brings us to the Gain page. This is where you would reduce the gain of a channel if it is clipping (red indicator at the top of the channel display). Use the GAIN slider to adjust the gain. The Trim slider is for digital recordings via USB and should not be adjusted.

You can return to the normal “Fader” view by clicking on the Fader icon at the top left of the screen:

SHUTTING DOWN
The DL32S will start up in the same state as it was when it shut down. This means that if we shut it down simply by turning off the power, when it comes back on, it will cause a loud (and possibly damaging) pop in the speakers, and it may be playing some music from some input that is still up, or a microphone may be open with the volume full up, and cause feedback. So, we need to mute all the outputs before turning off the system.
You could open all the panels and mute every output individually, or you could load the “Mute All 2026” show and recall the “Mute All” snapshot before turning off the power on the rack. I prefer to use the “Mute All 2026” approach.
M. Atchley