Visual Presentations
(Proclaim)
9/16/2021 Update
The generation of the visuals is a group effort. Several people contribute the elements, and one person (typically the A/V operator assigned to the Traditional/Contemporary service on that day) will put the elements together into a Proclaim presentation.
The Proclaim presentation is a combination of the pre-service announcements which are set up to loop, and the main body of the service, which is manually indexed during the service. After the service, the announcements will loop again.
A typical week's cycle works like this:
Sometime during the week, whoever is in charge of designing the Order of Worship will publish a preliminary order. That order will be forwarded to the assigned projection operator to begin preparing the material for the presentation.
The website UBC LIFE page is also updated, and is used to generate the pre-service announcements. M. Atchley typically generates the announcements.
The Choir Special or other special music, if available and covered under CCLI, will also be put into the Proclaim presentation.
Sometime late Friday or on Saturday, the A/V operator for the service will update the Proclaim presentation with the main sections of the service, and the lyrics to the hymns. This presentation is typically named according to the date and time of the service, for example, “Sunday October 14, 2018, 8:30 AM”.
Some features of Proclaim:
Proclaim has built-in pre-service and post-service announcement loops.
Another feature is that you can set the service start time, and at that time the pre-service loop stops, and the first service slide is displayed. You can set the pre-service loop to display a count-down timer for the benefit of service participants and live stream observers. You then step through the slides in the service section just like PPT, with the right arrow key.
If we have a video, it is easy to upload the video and insert it into the service wherever it is needed. When you advance to that slide, the movie starts. You can also upload audio files and have them cued and played by advancing to the slide.
In most cases, you can add a "song" element, and start typing the title, and a list from CCLI pops up. You can select the song (if the song text is in CCLI) and the words automatically populate the slide. For the Traditional service, sometimes the verse numbers and such are different than the Baptist Hymnal, but you can edit the verse numbers to make it match. It is useful to have one of our hymnals handy to verify the words, verses and versions. To use this feature, you must be a CCLI User (free feature) and sign in to CCLI from your Proclaim program. For the Contemporary service, the band leader typically determines the songs, versions and display of the lyrics.
A new feature of Proclaim is the capability to send the song lyrics to the live streaming software.
If you are running a presentation and notice a problem on an upcoming slide, you can stay live while editing the slide in the background, and no one will notice that there was a problem. It has some quick screens that you can go to if you want to edit the screen you are projecting. You can even jump to a quick scripture if the preacher springs one on you without notice - just type in the reference and it goes there.
Here is a link to training: https://support.proclaimonline.com/hc/en-us
Here are notes as to how to generate the Proclaim presentation. These may change as we learn more about the program.
PRE-SERVICE (Announcement) LOOP: The Team Lead will normally produce this element.
Note that the items below show how to generate the slides "from scratch." If the slides have been generated previously, they can be re-used by selecting Add Item - Reuse Item, then typing in the first few letters of the slide title and selecting one from the previous versions that are displayed.
Start with the logo slide (we may have different logo slides based on what sermon series is in use): Add Item - Content | Background - Browse Media - (choose the current logo background from our Group Upload). If the slide shows up in the service section, drag it to the PRE-SERVICE LOOP section. If you click on that title, any items you add while that title is highlighted will be added in the same section.
Announcement slides have preset places to put in the location, contact person, date & time. You do not have to use all of the items if they do not make sense or are redundant to the announcement text: Add Item - Announcement | Background - Browse Media (choose the current dark background from our Group Upload); copy and paste the announcement into the proper places in the text area, and then view the results in the image area (to the right) to see if adjustments to the text box size or font size are needed. I like to use some drop shadow on the text (click into the text box, then select Effects - Drop Shadow) particularly if the background has lighter areas in it that might make it more difficult to distinguish the text.
You may either generate the next announcement slide as above, or you may prefer to right-click the announcement slide label in the left column and select Duplicate, and then paste in the appropriate text for the next slide replacing the original text. This keeps the background, text effects, etc. from the original slide so that you do not have to do those changes over again on every slide.
When you finish generating the Pre-Service loop, you may select all (click top item, hold SHIFT and click the bottom item) right-click and GROUP the slides, then collapse the group to a single line, select the GROUP, right-click and duplicate it, collapse the new group to a single line and drag it down into the POST-SERVICE LOOP. Any slides that are no longer appropriate after the service can be deleted from the Post-service loop.
To provide a countdown before the Live Stream starts, select the slides in the PRE-SERVICE LOOP and set each to “Show a countdown clock.”
WARM-UP: This is used in some churches to get the congregation fired up in anticipation of the service, and has a countdown clock. We are not using this feature
SERVICE: This is where the slides announcing each section of the service, the songs and the scriptures go.
I like to start with a logo slide. This can be a copy of the logo slide in the Pre-Service Loop. At the time the service is scheduled to start (8:30, for example) the Pre-Service Loop will stop and the first slide of the service will be displayed.
Add the next slide (typically PRELUDE or WELCOME). If there is no slide to re-use, select Add Item - Content | Background - Browse Media (choose the current dark background from our Group Upload). Copy/Paste the slide title into the text area, and adjust the font size as necessary. I prefer large, generally 100 point for titles. If you need an additional text of different size, add a text box, paste in the text, then move the box borders around until the position is where you want it to be. Set the font size. Note that if you set the size such that the text will not fit in the text box, the text size will automatically be as large as possible given the box size. If you try to increase the text size, you will notice that it does not increase.
You may duplicate the slide above and paste text from the next section into the text area to make the next slide (or re-use a slide from a previous presentation, if available).
SONGS - One of the nice features in Proclaim is that you can insert a song element (Add Item - Song. Note that you must be an active CCLI User ( a free sign-up) for this feature to work. You may then activate this feature in Proclaim). If you begin typing the title of the song into the title block, a list of possible songs from CCLI or FaithLife may be generated, and you can select the appropriate one from the list, which populates the title, lyrics and copyright sections automatically. Compare the lyrics with our hymnal (Traditional service) to make sure they are the same, or at least the verses we want to sing are included, and that the attribution (copyright) information is correct. There is a command line above the lyrics box. If you check to activate it, you can specify what order the verses and or choruses are sung, so that they match what we want to do in the service - without having to cut/paste or delete extra verses.
Some concerns:
The good thing about Proclaim is that it automatically links to our CCLI account and lets us load song texts directly from CCLI to Proclaim.
However, not every song text is in CCLI, and Proclaim will load song texts from outside of CCLI. These songs may or may not be covered by CCLI.
If the song is in Public Domain, we can use it. If not, we need to search CCLI to see if it is a covered song for which they do not supply the text. To do this, go to www.ccli.com and use the "What We Provide" drop-down menu, and select "Song Search." Type in the song title in the search box, and see if a song with the same publisher and copyright year is in CCLI. If the song is not shown, check the “Expand search to show all songs” box in the upper left and search again. If the song is displayed, we can use the song. Add the CCLI song number to the slide, and also our CCLI license number 952559.
Another wrinkle is that the songs that load directly from Proclaim may not have the same verses or number of verses, or may have different wording than the version in our hymnal (Traditional service). It is best to go through each song word-for-word and compare to the hymnal.
If a song text is not covered by CCLI and is not in Public Domain, we are not allowed to project the words. In this case, add a text box to the Hymn announcement slide to add "Please use your hymnal" if appropriate.
A new feature of Proclaim is the capability to send the song lyrics to the live streaming software. This requires some additional formatting:

To fit on the live stream screen, we split all lyrics into two lines and select the center-justified alignment.

There is a second tab on the control screen “Live Stream Lyrics” that controls what parts of a slide are sent to the Live Stream, and how they are formatted. For most slides, we use “Duplicate” which sends the entire slide. for song lyrics, we select “Foreground Only” which sends only the lyrics.

The slide background will no longer be sent to the Live Stream, indicated by the appearance of a checkered background.
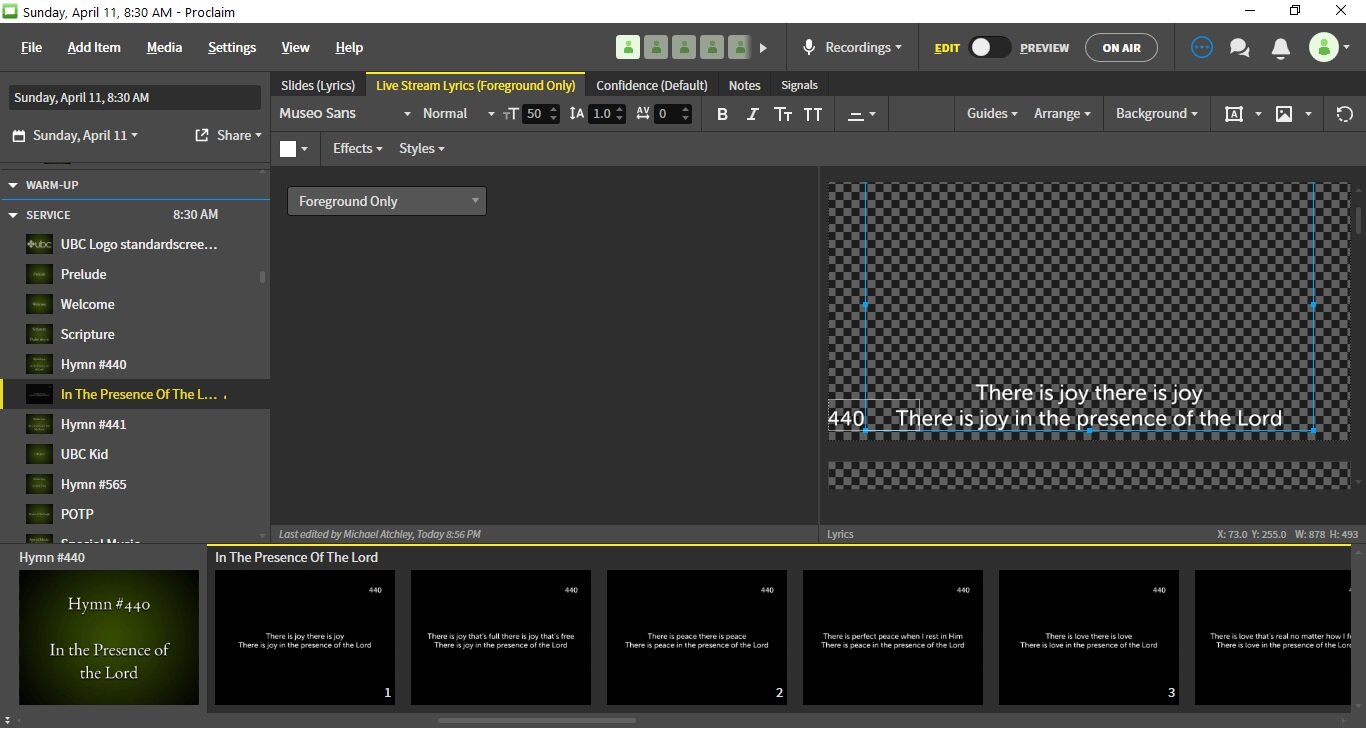
Align the lyrics to bottom center and the hymn number to bottom left and move each text box near the bottom of the screen, approximately one row of squares above the bottom. This places the text approximately in the position to display over the text bar in the Live Stream. The Hymn number (if used) can be located either to the left or the right of the text. If the text “collides” with the hymn number, you can move the text box right or left to provide some separation.
Scroll down to the last slide for the song and expand the text box for the copyright information, set the hymn number alignment to “left bottom” and position both text boxes as above, approximately one row of squares above the bottom of the slide:

Scroll down to the last slide for the song and expand the text box for the copyright information, set the hymn number (if used) alignment to “left bottom” and position both text boxes as above, approximately one row of squares above the bottom of the slide.
The position of the text box should be reviewed Sunday morning before the service with the Live Stream operator and final alignment adjustments made for best aesthetics.
Check the display of the lyrics in the Live Stream software by taking Proclaim “On Air” and observing lyric alignment on the Live Stream screen when the song is selected for projection. Make any final adjustments as above in the “Live Stream Lyrics” tab.
SCRIPTURES - These can either be from the Bible or the On-Screen Bible. The On-Screen Bible is animated, and the scriptures "fly in" from some direction, depending on which option you choose: Add Item - On-Screen Bible, highlight color/style choice, type in the scripture reference, and click on the → arrow at the end of the box. Unless otherwise specified, we use the NIV.
SERMON - Justin will often have a scripture reference (or two) in his sermon. The way I handle this is to make a sermon title slide, then duplicate it, and insert the scripture reference between the two Sermon slides. Sometimes he may want three sermon slides with two different scriptures.